Vinyl plank flooring is known for its durability, water resistance, and low maintenance. But glue spills from installation, furniture pads, or everyday mishaps can leave behind sticky residue that’s hard to ignore. If not removed properly, glue can attract dirt, dull the finish, or even damage the surface.
The type of glue, how long it’s been on the floor, and what tools you use all affect how easy or difficult the cleanup will be. Many homeowners make the mistake of using harsh chemicals or abrasive tools that can scratch or discolor the planks. The key is using gentle, vinyl-safe methods that break down adhesive without harming your flooring.
This guide will show you how to safely and effectively remove glue from vinyl plank flooring using the right tools and techniques without risking long-term damage.
Most Common Glues for Installing Vinyl Plank Flooring
While many vinyl plank flooring systems today are click-lock or floating, glue-down vinyl flooring is still widely used in both residential and commercial spaces. Choosing the right adhesive is essential for proper installation, long-term durability, and floor performance. Below are the most common types of glue used to install vinyl plank flooring:
1. Pressure-Sensitive Adhesive (PSA)
Pressure-sensitive adhesive is one of the most popular choices for vinyl flooring, especially in high-traffic or commercial areas. It remains tacky even after drying, allowing for minor adjustments during installation. PSA is easy to apply and offers a strong, flexible bond that holds up well over time.
2. Hard-Set Adhesive
This adhesive forms a firm, permanent bond between the vinyl planks and the subfloor. It’s ideal for areas with heavy furniture or rolling loads, such as offices or kitchens. Hard-set adhesives prevent shifting or movement, making them perfect for glue-down vinyl flooring installations that require maximum stability.
3. Releasable Adhesive
Releasable adhesives are designed for temporary or semi-permanent installations. They allow for easier removal or replacement of planks in the future, making them ideal for rental properties or areas where flooring may need to be updated frequently.
4. Multi-Purpose or Universal Flooring Adhesive
As the name suggests, this type of adhesive works on a wide variety of flooring types, including vinyl, carpet, and rubber. It’s versatile and convenient but may not offer the specialized performance of adhesives made specifically for vinyl plank flooring.
5. Acrylic-Based Adhesive
Acrylic adhesives are water-based, low in VOCs, and commonly used for vinyl flooring due to their ease of use and moisture resistance. They’re a great choice for indoor installations and are considered environmentally friendly compared to solvent-based options.
How to Prepare Before Removing Glue from Vinyl Plank Flooring
Before you dive into removing glue from your vinyl plank flooring, it’s important to take a few preparation steps to protect your floors and ensure effective results. Proper prep helps prevent accidental damage and makes the removal process smoother and more efficient.
1. Identify the Type of Glue
Different glues respond to different removal methods. Try to determine if you’re dealing with construction adhesive, pressure-sensitive adhesive, craft glue, or tape residue. This will help you choose the safest and most effective cleaning approach.
2. Review Manufacturer Guidelines
Always check your flooring manufacturer’s care instructions. Some vinyl products may be sensitive to certain chemicals or heat, and using the wrong method could void your warranty or damage the surface.
3. Test in a Hidden Spot
Before using any cleaning solution or adhesive remover, apply it to a small, inconspicuous area. This test helps you make sure it won’t discolor, dull, or damage the plank surface.
4. Gather the Right Supplies
Have all your tools and materials ready before you begin. This typically includes microfiber cloths, a plastic scraper, warm soapy water, alcohol or adhesive remover, and a hair dryer (for heat-assisted methods). Working with the right supplies avoids unnecessary delays and helps prevent damage from improper tools.
5. Ventilate the Area
If you’re using chemical removers or alcohol-based solutions, make sure the space is well-ventilated. Open windows or use fans to maintain good airflow and reduce exposure to fumes.
Tools for Removing Glue from Vinyl Flooring
Having the right tools and materials makes the difference between successful glue removal and potential floor damage. Here’s what you should gather:
- Essential Tools include a plastic putty knife or scraper (avoid metal tools that can scratch), clean rags or paper towels, a bucket for cleaning solutions, and rubber gloves to protect your hands.
- Cleaning Materials should include warm water, dish soap, white vinegar, baking soda, and commercial adhesive remover designed for vinyl flooring. Avoid harsh chemicals like acetone or paint thinner, which can damage vinyl.
- Optional Heat Sources such as a hair dryer or heat gun can help soften stubborn adhesive, making it easier to remove. Use these tools carefully to avoid overheating and damaging the vinyl.
- Safety Equipment includes knee pads for comfortable floor-level work, adequate lighting to see all residue clearly, and good ventilation if using any commercial products.
Step-by-Step: How to Remove Glue from Vinyl Plank Flooring
Follow this systematic approach for the safest and most effective glue removal:
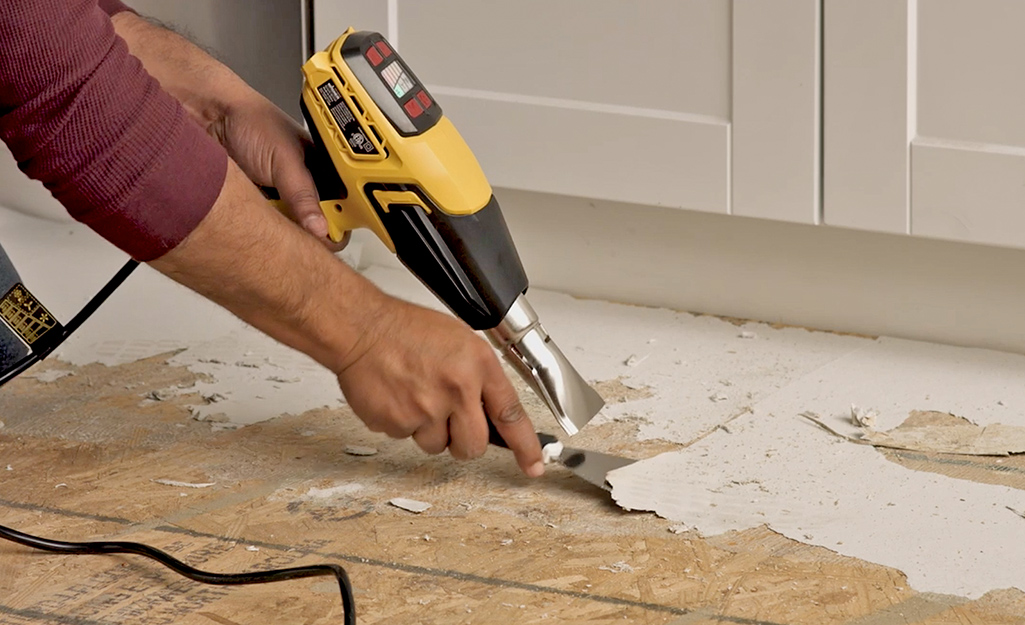
Step 1: Start with Heat and Scraping
Begin by gently warming the glue with a hair dryer set on low heat, holding it several inches away from the surface. Once the adhesive becomes pliable, use a plastic putty knife to carefully scrape away as much glue as possible. Work slowly and avoid applying excessive pressure that could scratch the vinyl surface.
Step 2: Apply Your Chosen Cleaning Solution
For remaining residue, apply your selected cleaning solution. Start with the gentlest option first – a mixture of warm water and dish soap. Let the solution sit for 10-15 minutes to penetrate and soften the adhesive.
Step 3: Gentle Scrubbing and Removal
Using a soft cloth or sponge, gently scrub the area in circular motions. For stubborn spots, reapply the cleaning solution and allow more dwell time. Avoid abrasive scrubbing that could damage the vinyl’s protective wear layer.
Step 4: Rinse and Inspect
Thoroughly rinse the area with clean water to remove all cleaning solution residue. Dry the surface completely and inspect for any remaining glue. Repeat the process as needed for persistent adhesive spots.
Step 5: Final Cleaning
Once all glue is removed, clean the entire floor with your regular vinyl floor cleaner to ensure uniform appearance and remove any cleaning solution residue.
Tips to Avoid Damaging Your Vinyl Planks
Vinyl plank flooring is durable, but it’s still vulnerable to scratches, discoloration, and chemical damage, especially during glue removal. To protect your floors and maintain their appearance, follow these key tips:
1. Avoid Metal Tools or Sharp Scrapers
Never use metal blades, knives, or steel wool to scrape glue. These can easily scratch or gouge the surface. Instead, use a plastic putty knife or scraper designed for delicate surfaces.
2. Don’t Use Harsh Chemicals
Stay away from strong solvents like paint thinners, bleach, or ammonia. These can strip the finish, stain the planks, or cause them to become brittle over time.
3. Limit Water Exposure
While vinyl is water-resistant, soaking the floor with too much liquid can damage the adhesive beneath or seep into seams. Use a damp cloth, not a soaking wet one, and dry the area thoroughly afterward.
4. Apply Heat Carefully
If you’re using a hair dryer or heat gun to soften stubborn glue, keep it on a low setting and don’t overheat one spot. Too much heat can warp or discolor the vinyl.
5. Always Wipe Clean After Using Adhesive Removers
Even if you’re using vinyl-safe adhesive removers or alcohol, be sure to wipe off any residue completely. Leaving cleaner on the surface may dull the finish over time.
Need Help Restoring Your Vinyl Floors?
Let the pros handle stubborn glue and protect your flooring investment. Call Allison’s Flooring Installation at (502) 794-2620 for expert vinyl plank care, cleaning, or replacement services done right the first time.